
Table of Contents
Hey there, all the amazing bakers from around the world! Today, we are going to talk about how to make cake nozzles at home! Although cake nozzles are easily available in the market, making them at home is much easier and affordable. You can mold these nozzles and use them in different ways by holding them at various angles to get your desired shape and designs while doing the frosting part.
Making your own DIY piping tip at home gives you the freedom to customize the design and shape and brings a personal touch to your baking. You can craft nozzles that cater to your specific needs using materials like parchment paper or sturdy plastic sheets. Moreover, homemade nozzles can be a great solution when you’re in a pinch and don’t have a specific tip handy. The satisfaction of crafting your own tool and then using it to adorn your baked masterpiece is unmatched. Remember, creativity in baking isn’t limited to just recipes; it also extends to the tools! So, try the DIY piping tip, and let your imagination run wild!
Any guesses on what we will use to make the cake nozzles at home? Well, waste cans are going to soon turn into cake nozzles. It will take just around 5 minutes to do so. Let’s get started with the things required and the process.
Things Required
- Empty Can of Pop Soda (Coca Cola, Sprite, Pepsi, etc.)
- Scissors
- Tape
- Plastic Bag or Piping Bag
Instructions
- Cut out the top part of the can carefully.
- Now cut the can from the middle towards the downward part.
- Remove the bottom part to get a flat sheet.

- Cut the sheets from all the sides to get a smooth surface.
- Now roll it to get a rectangular shape.
- Fold the sheet to divide it in two equal parts.
- Cut the two parts.
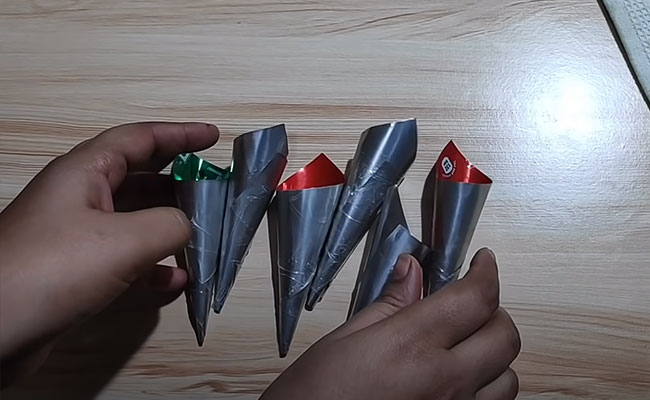
- Roll the sheet in the form of a cone with a desirable opening on the end.
- Take a tape and paste it on the cone surface so that it doesn’t open.


For Different Nozzle Designs
- To make a star nozzle, cut the top part a little and then start cutting the nozzle in a zig-zag pattern. Bend the top part after cutting to get the star design.
- To make a leaf nozzle, cut the top part a little and then flatten the top end. Cut the parts from both ends of the flattened tip. Cut slightly from the middle to give it a leaf design.
- To make a basket nozzle, cut the top part a little. Now cut one side in a small zig zag pattern keeping the other side smooth. Now flatten the top part to get a basket design.
- To make a rose nozzle, cut the top part a little and then flatten the top end. Cute the top end diagonally at 45 degrees angle. Take a toothpick and insert it on the large corner. Press properly to get a rose design.
- Now you can take the plastic bag or piping bag and fill it with whipped cream by attaching the nozzle on one side of the bag. Make designs as you like.


So, that’s how you make cake nozzles at home easily. In two or three tries, you will be able to cut the nozzle designs perfectly. Make sure you do all this carefully. You can order cake online in case you are unable to make the cake or nozzles to decorate. So, stop worrying about all the hassle anymore and say, thanks to this simple method that you can use to make your own cake nozzle at home. With a little bit of practice and by using some simple tools, you can make your own cake nozzles and the perfect DIY piping tip too. All the required materials can be found at local or online craft stores, and when you are done, you will have a set of custom-made, completely clear cake nozzles. The most incredible thing is that in this way, you can create your dream cake and put it at the top of your list as a professional. Now you can show off your skills with this impressive effect that will surprise everyone at your next party! Happy baking! Happy decorating!